

Office 365 Setup Guide
A step-by-step walkthrough to get your business email and domain configured.
1
Create Your Office 365 Account
To get started, you will need to choose a Microsoft 365 plan and create your initial admin account.
- Navigate to the official Microsoft 365 business or Non-profit 501(c)(3) page and select the plan that best fits your needs (e.g., Business Basic, Business Standard).
- Click on Buy now or Try free for one month.
- Enter the email address you currently use. Microsoft will check if you need to create a new account.
- Fill in your business details, including your name, business phone number, and company size.
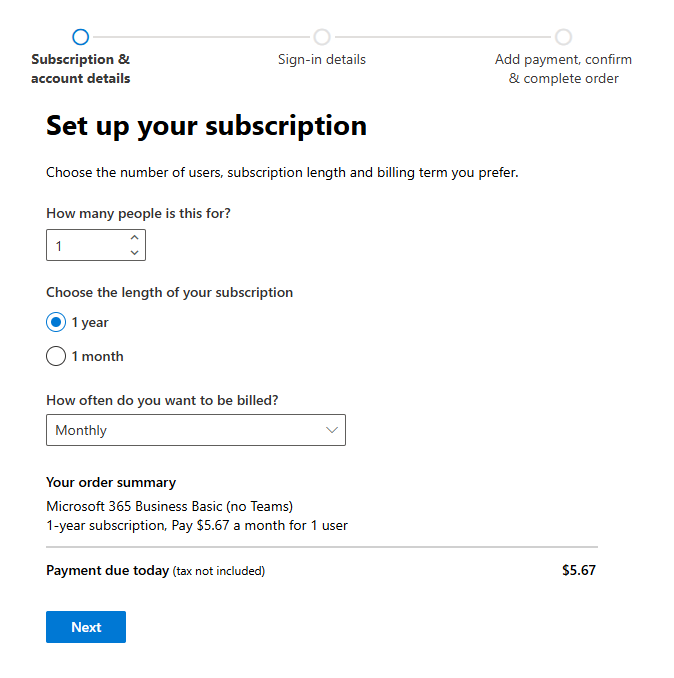
- Create your temporary Microsoft routing domain (e.g., yourcompany.onmicrosoft.com) and establish your Admin username and password.
2
Add Your Custom Domain
To use professional email addresses (like name@yourcompany.com), you need to connect your custom domain to Office 365.
- Log in to the Microsoft 365 Admin Center using the admin credentials you just created.
- In the left-hand navigation menu, go to Settings > Domains.
- Click on Add domain and enter the domain name you own.
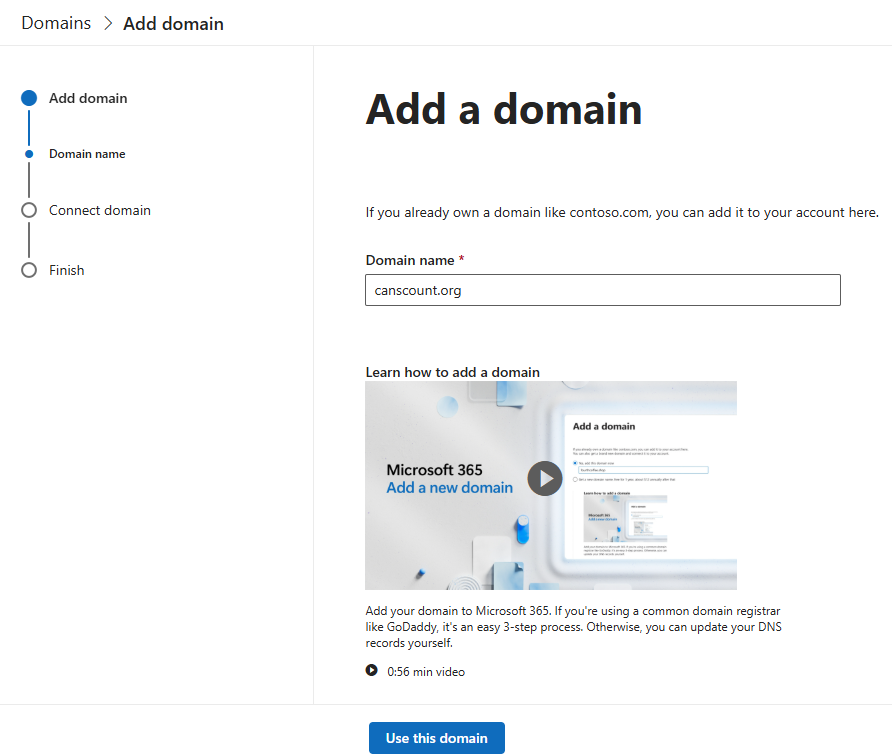
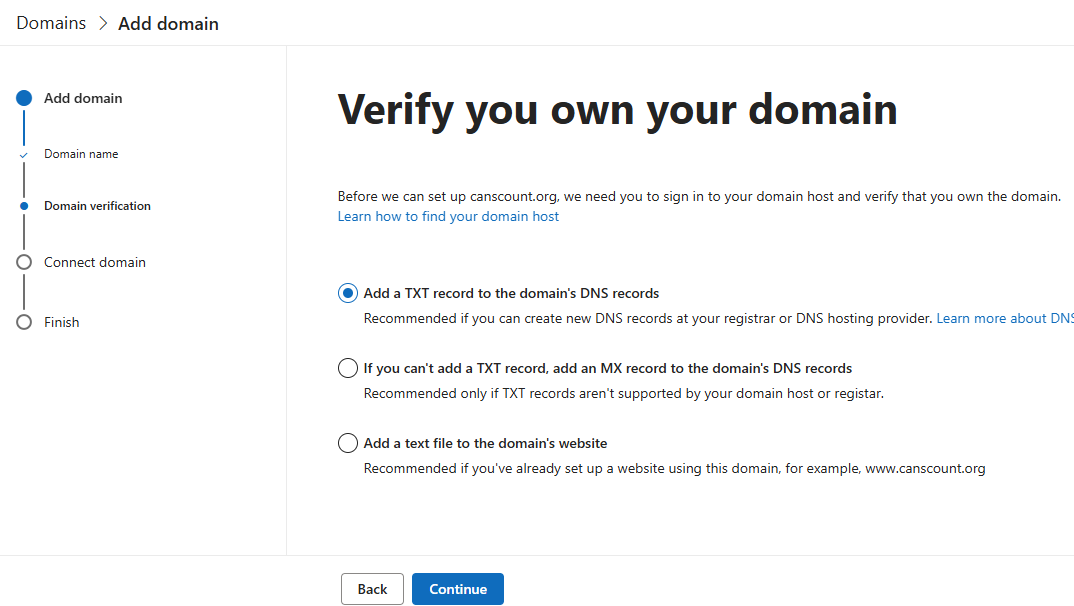
- Verify ownership: Check Add a TXT records to the domain's DNS
- Microsoft will provide a TXT record settings.
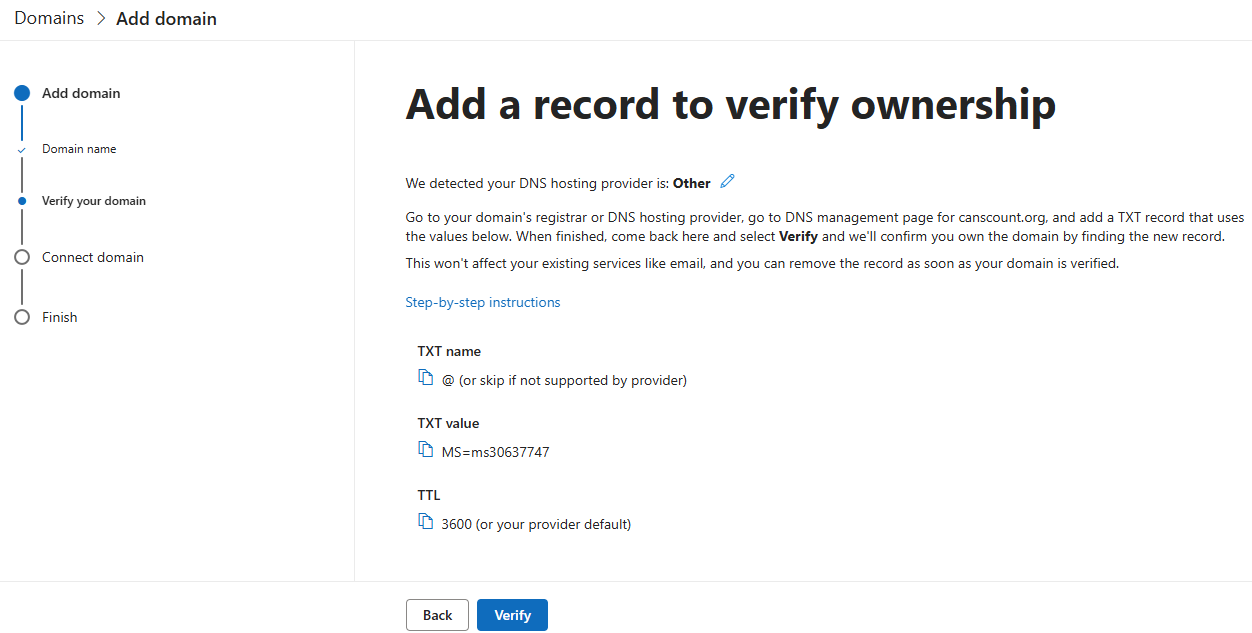
- If ISADEX manages your DNS, send those records to info@isadex.com. Domains can only be verified after the changes to DNS have been made. ISADEX will email you as soon as those changes have been completed.
Once you received confirmation from ISADEX that the DNS record has been added click "Verify" at the bottom of the screen. - If you control your own DNS, log in to your domain registrar (e.g., GoDaddy, Namecheap) and add this TXT record to your DNS settings.
- If ISADEX manages your DNS, send those records to info@isadex.com. Domains can only be verified after the changes to DNS have been made. ISADEX will email you as soon as those changes have been completed.
- Return to Microsoft 365 and click Verify.
- Note: DNS changes can sometimes take anywhere from 10 minutes to 24 hours to propagate across the internet.
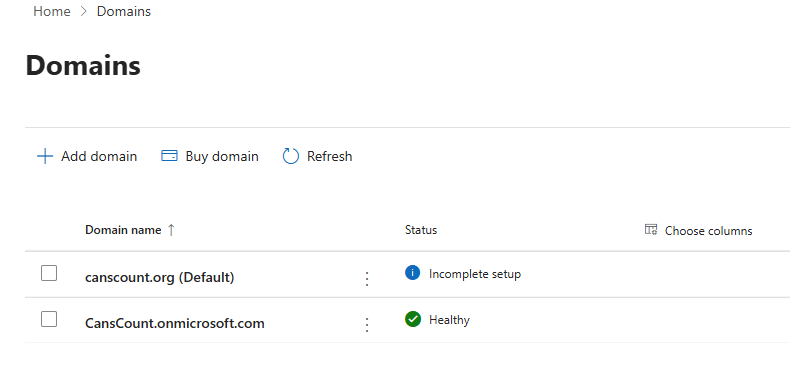
- After verifications completes exit out of this window. Do not proceed to connecting the domain at this time. We recommend creating all user accounts before making further DNS changes.
3
Create User Accounts for each mailbox
- In the left-hand navigation menu, go to Users > Active Users.
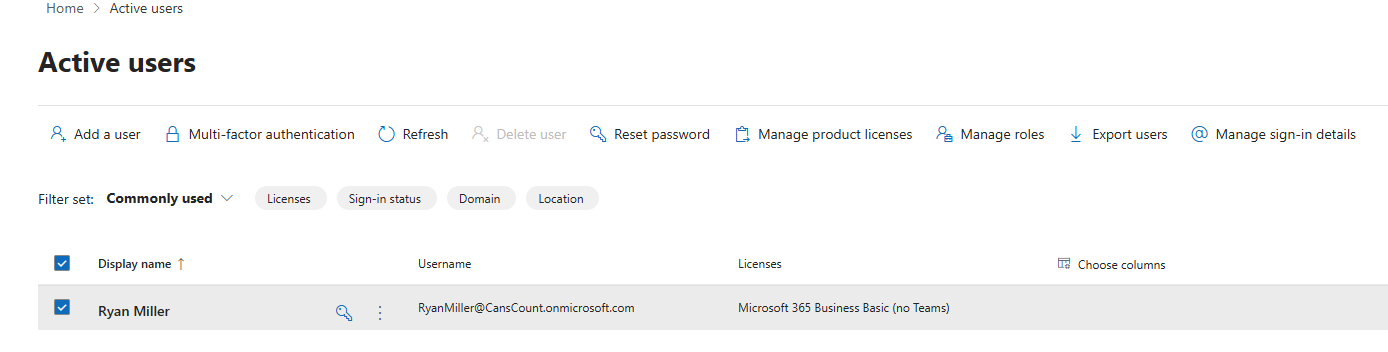
- Click on Add a user.
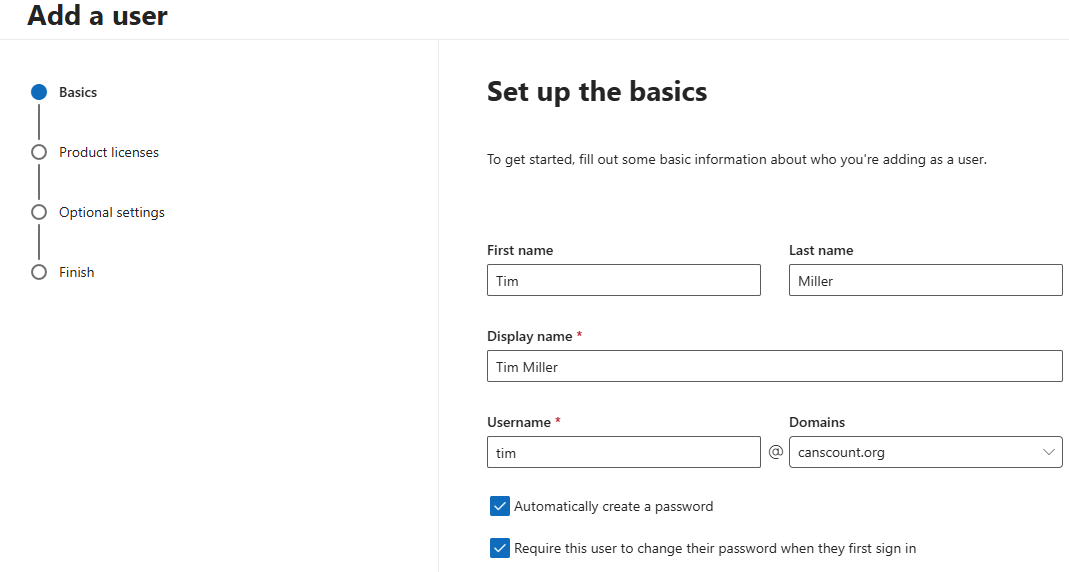
- Follow the prompts to create a new user/email account, making sure to select your custom domain name from the Domains drop down.
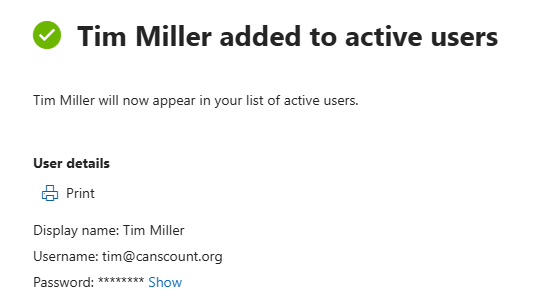
- The username and password used to access the new account is provided on the last step when creating each user.
- Every user who needs to send/receive emails or access Microsoft 365 services using your custom domain (e.g.,
you@yourdomain.com) requires their own assigned paid license. - You may need to click the "Refresh" icon above the users in order to see newly created users.
- The username and password used to access the new account is provided on the last step when creating each user.
4
Complete the Domain setup
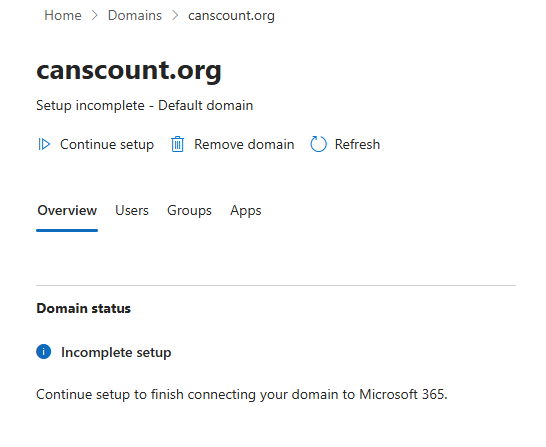
- In the left-hand navigation menu, go to Settings > Domains.
- Click on your custom domain name.
- Click Continue Setup.
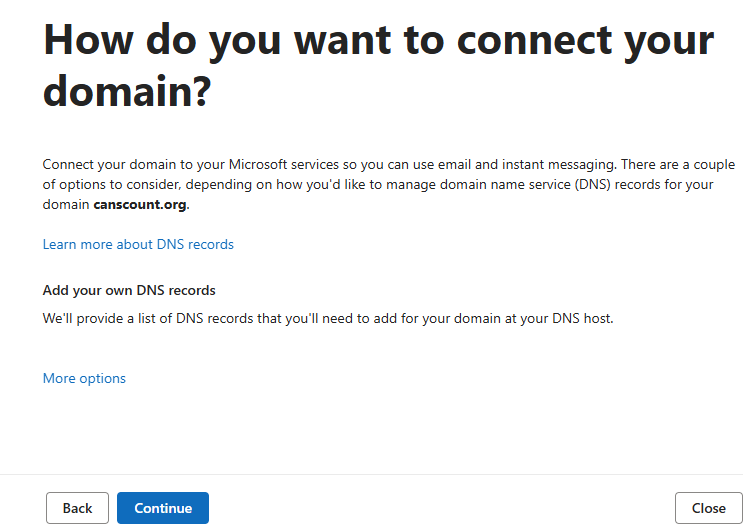
- Click Continue.
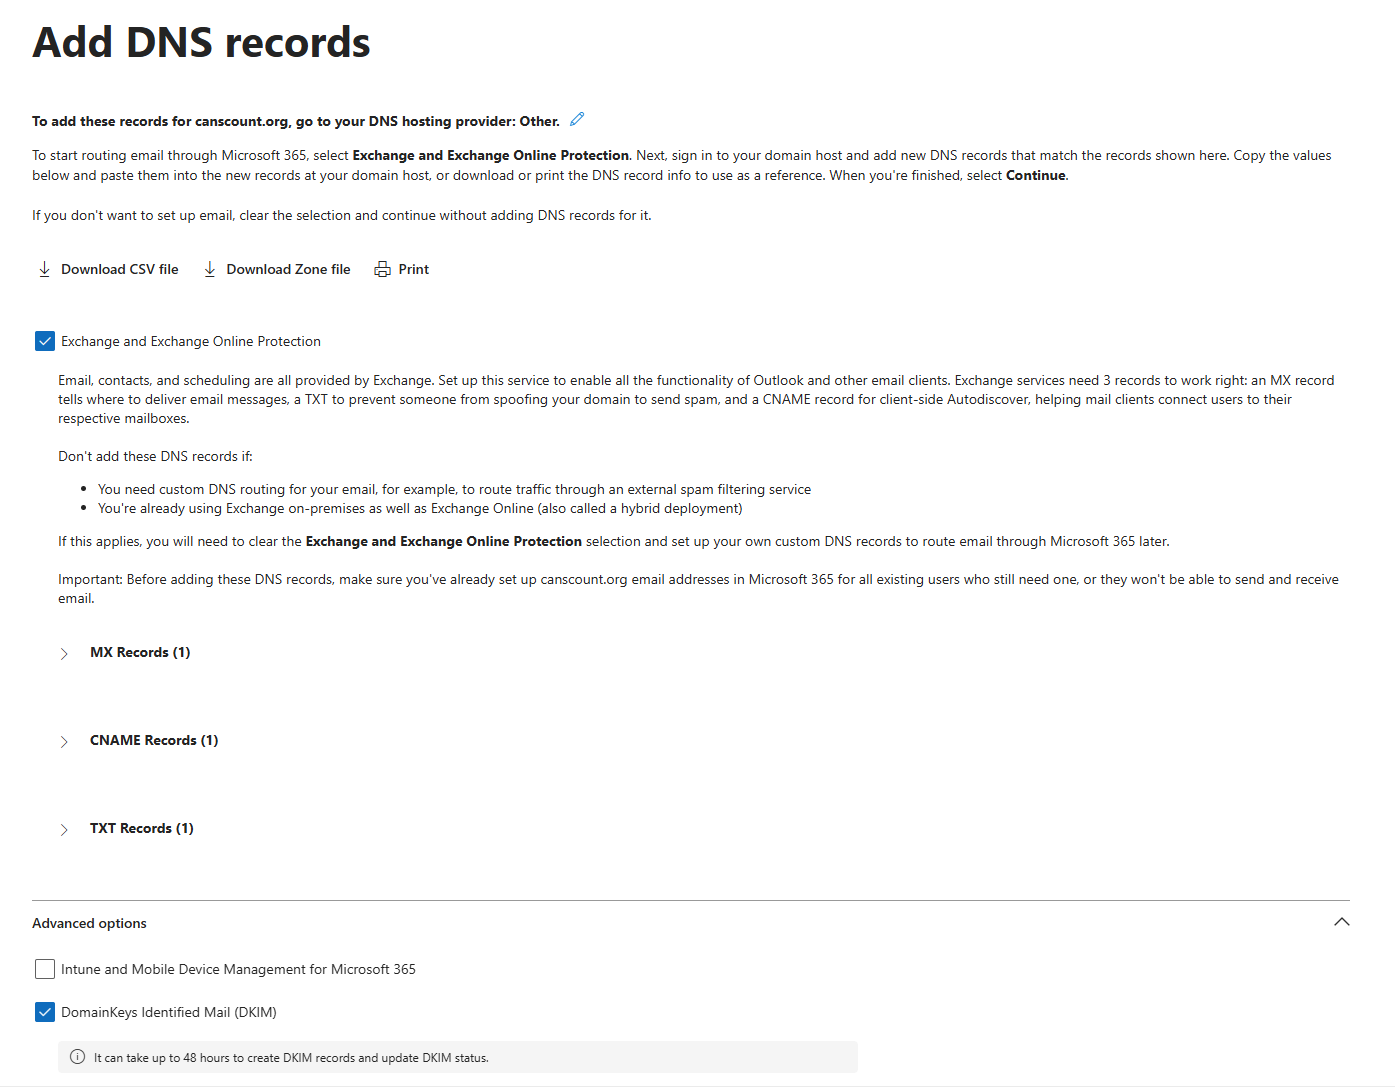
- Check Exchange and Exchange Online Registration and DomainKeys Identified Mail (Under Advanced Options)
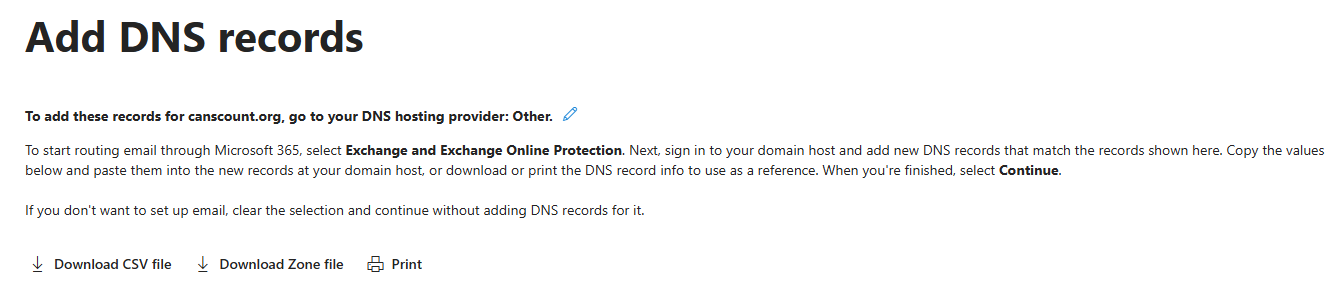
- Click Download CSV file
- Microsoft will provide a TXT record settings.
- If ISADEX manages your DNS, send those records to info@isadex.com. Domains can only be verified after the changes to DNS have been made. ISADEX will email you as soon as those changes have been completed.
Once you received confirmation from ISADEX that the DNS record has been added click "Verify" at the bottom of the screen. - If you control your own DNS, log in to your domain registrar (e.g., GoDaddy, Namecheap) and add this TXT record to your DNS settings.
- If ISADEX manages your DNS, send those records to info@isadex.com. Domains can only be verified after the changes to DNS have been made. ISADEX will email you as soon as those changes have been completed.
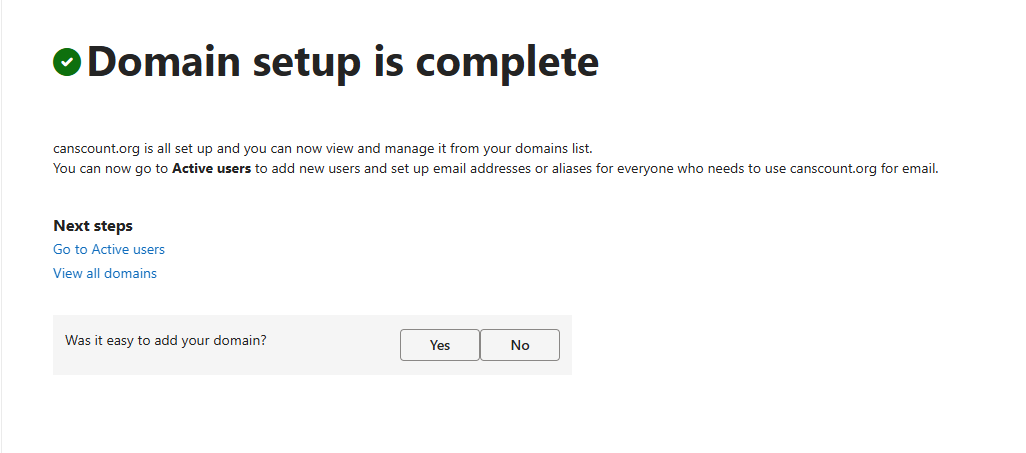
- Success: Domain setup is complete.
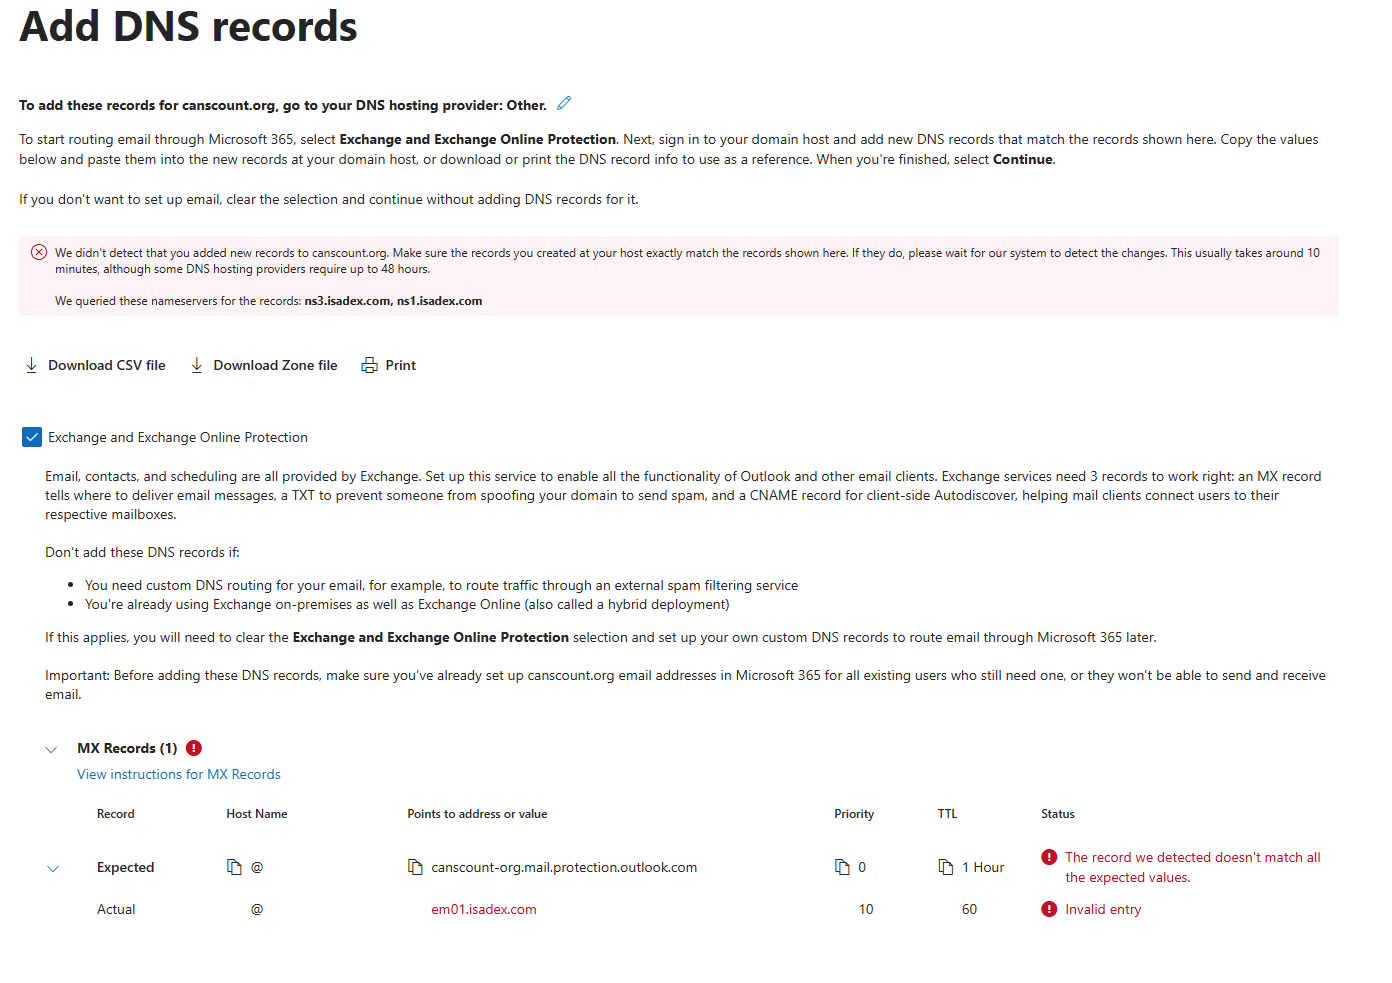
- Failed: If one or more records have failed you will be notified that Microsoft couldn't detect certain records. A list of the failed records are provided.
- If ISADEX manages your DNS, create a Support Request in your websites admin area (Resources >> Support Requests). Domains can only be verified after the changes to DNS have been made. ISADEX will email you as soon as those changes have been completed.
Once you received confirmation from ISADEX that the DNS record has been added click "Verify" at the bottom of the screen. - If you control your own DNS, log in to your domain registrar (e.g., GoDaddy, Namecheap) and add this TXT record to your DNS settings.
- If ISADEX manages your DNS, create a Support Request in your websites admin area (Resources >> Support Requests). Domains can only be verified after the changes to DNS have been made. ISADEX will email you as soon as those changes have been completed.
- Click Done
*
Transfer Your Existing Email Optional
If you are migrating from ISADEX you can transfer your historical emails directly into your new Office 365 inbox.
- In the Microsoft 365 Admin Center, click on Show all in the left menu, then select Exchange to open the Exchange Admin Center.
- Navigate to Migration and click on Add migration batch.
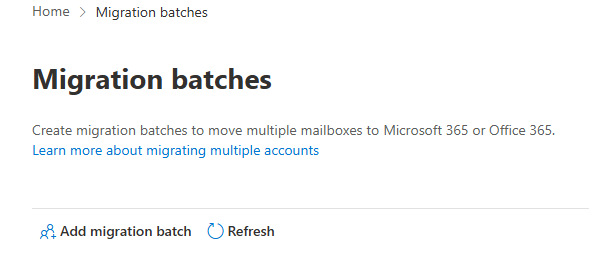
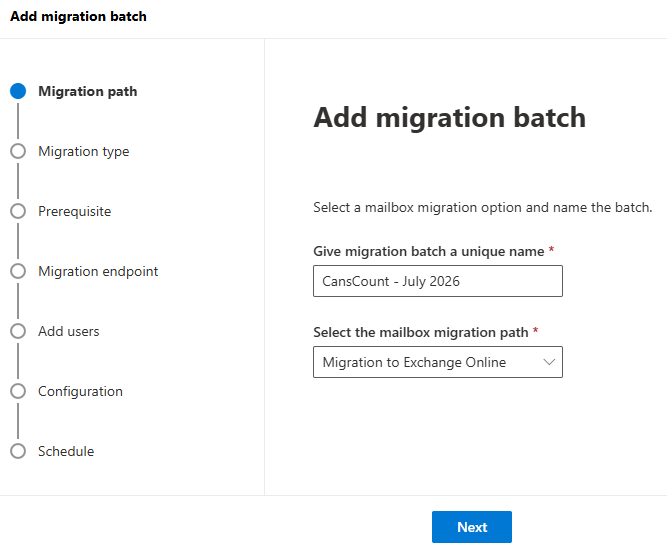
- Enter a Unique Batch name (ex: CansCount - July 2026) and select Migration to Exchange Online from the migration path dropdown. Click Next.
- Select IMAP migration from the migration type dropdown. Click Next
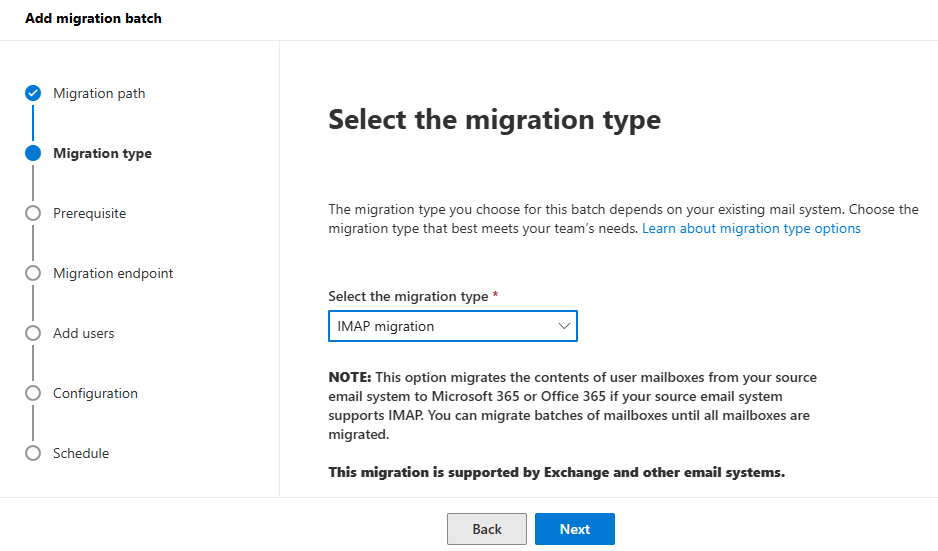
- Prerequisite - Click Next
- Check "Create a new migration endpoint. Click Next
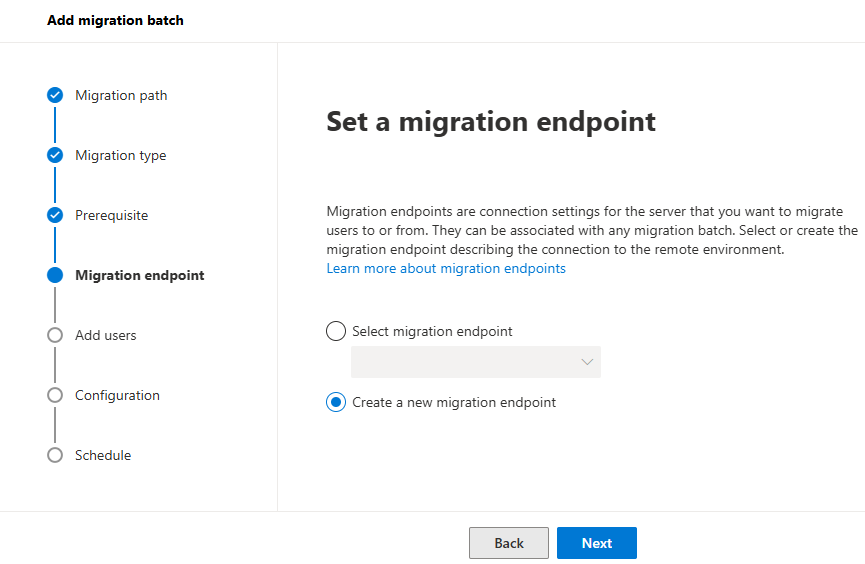
- Enter endpoint account settings. Click Next
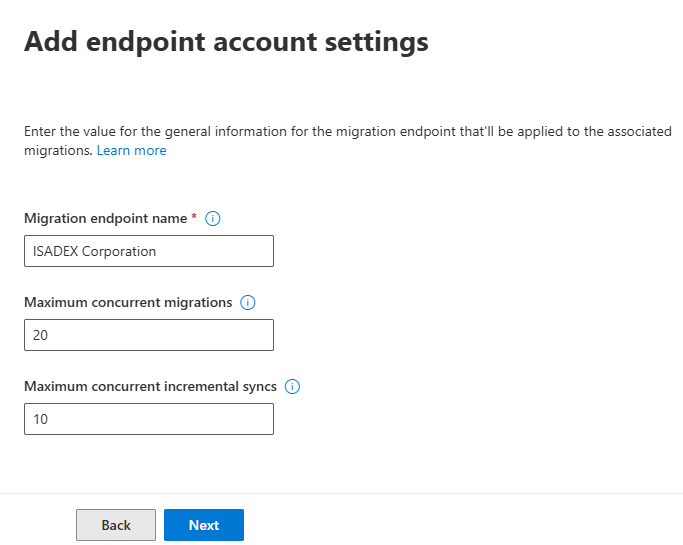
- Migration endpoint name: ISADEX Corporation
- Maximum concurrent migrations: 20
- Maximum concurrent incremental syncs: 10
- Enter IMAP migration configuration settings. Click Next
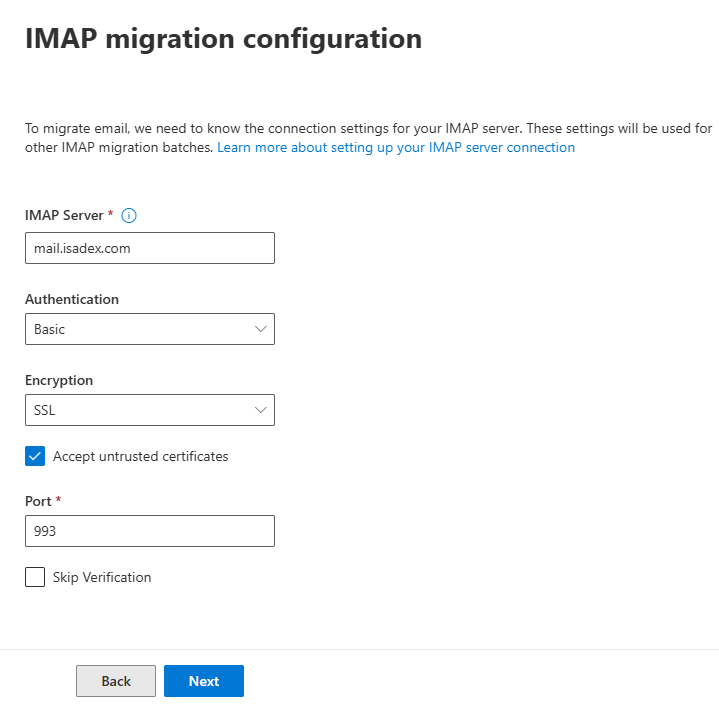
- IMAP Server: mail.isadex.com
- Authentication: basic
- Encryption: SSL
- Accept untrusted certificates: checked
- Port: 993
- Skip Verification: unchecked
- Check endpoint setup status
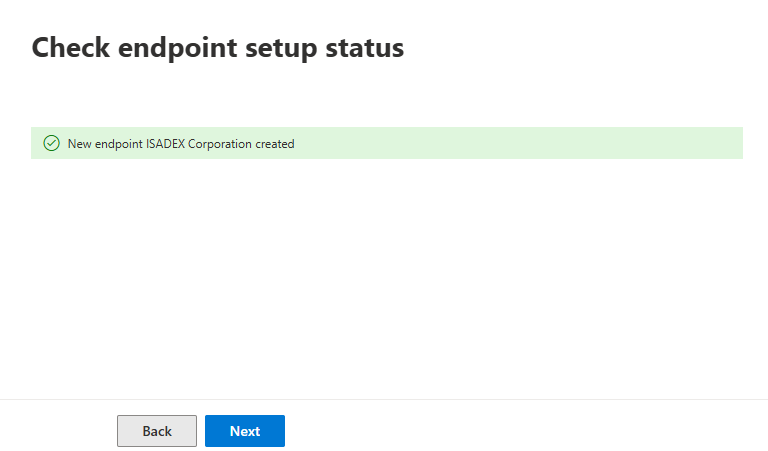
- Add user mailboxes
- Download one of the CSV files
- Open it in Excel or a similar app and add your ISADEX hosted email account information for each email account that you will be migrating. Both email address and the username are the full email address of the account being transfered.
- Save the file to your computer.
- Click the Import CSV file and select the document that you saved. Click Next.
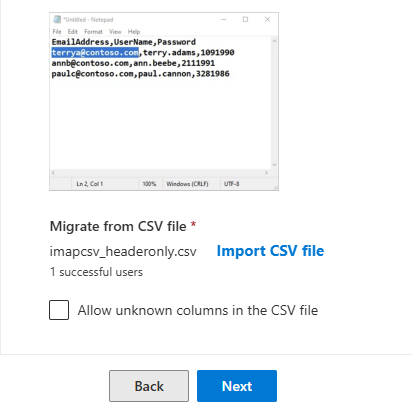
- Select configuration settings.
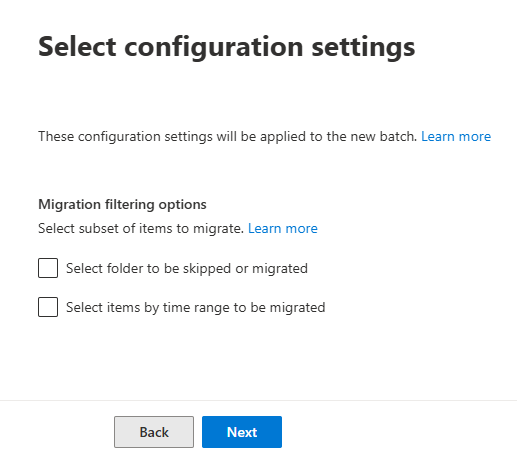
- Leave both boxes uncheck to bring over all emails and folders from your ISADEX accounts.
- If you wish to only import emails from a certain date range, or want to exclude certain folders please list them on this page.
- Click Next
- Schedule batch migration.
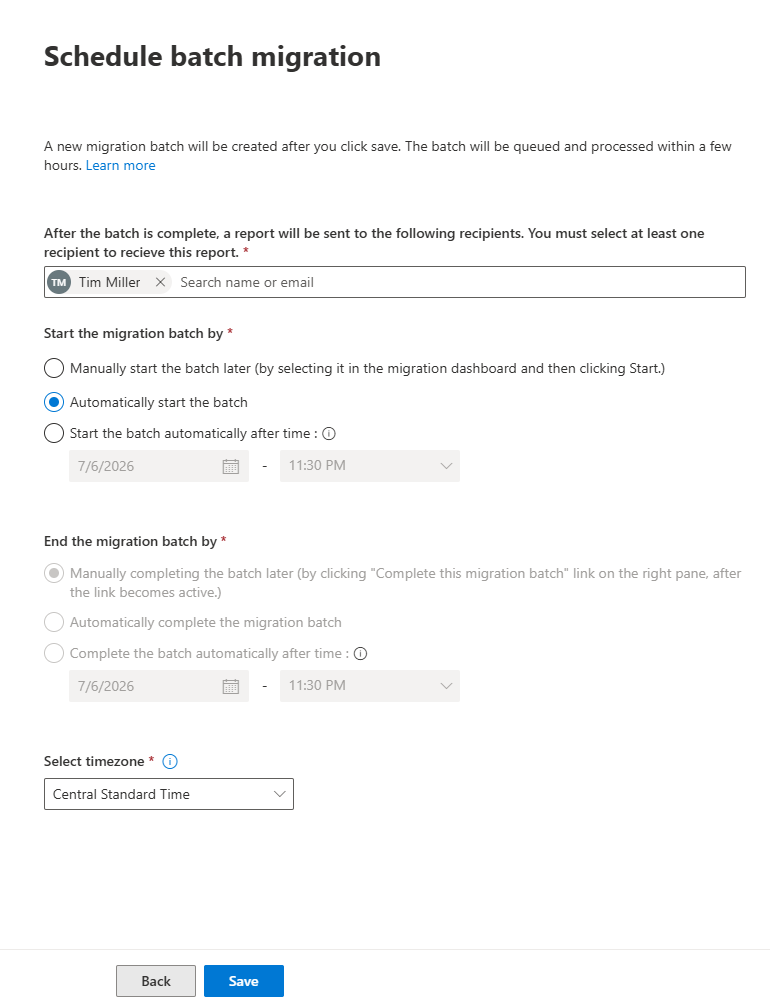
- Enter one or multiple email addresses to be notified when the batch completes.
- You can schedule the batch to start at a specific time, or now.
- Select Time zone. By default ISADEX servers are set to Central Standard Time.
- Click Save
- Generate Batch Process
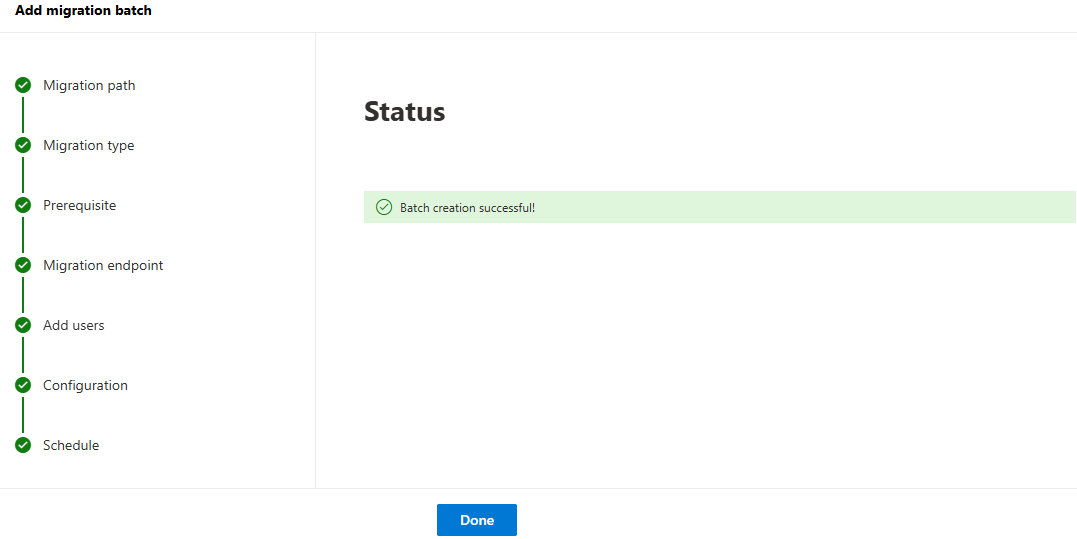
- The batch process may take several seconds to generate. Once the batch is completed you will receive a notice that the creation was successful. The batch will start at the time that you desiganated and will take anywhere from a few minutes to several days to complete based on the number of emails and email accounts that you are migrating.
- Click Done
- Click the refresh button to see the newly created batch and the progress.
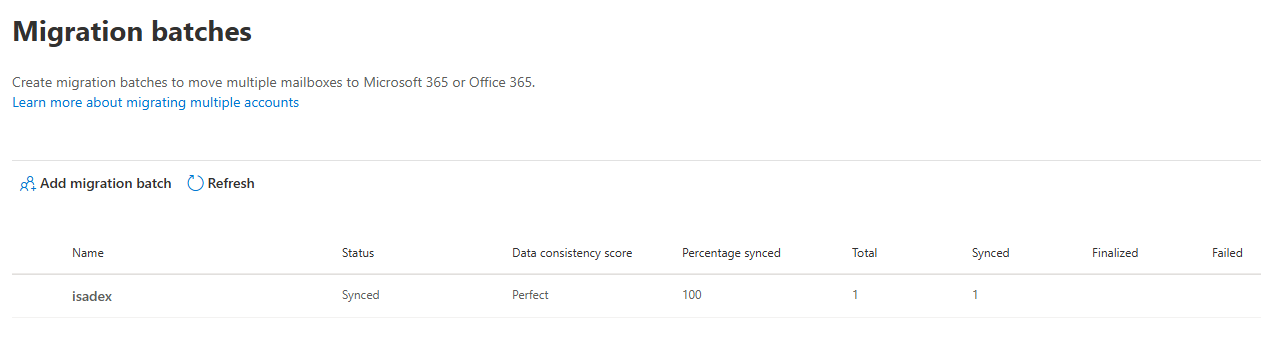
Once the sync status shows as "Synced," all your historical emails will be securely stored in your new Office 365 account.